Open Access is an initiative that aims to make scientific research freely available to all. To date our community has made over 100 million downloads. It’s based on principles of collaboration, unobstructed discovery, and, most importantly, scientific progression. As PhD students, we found it difficult to access the research we needed, so we decided to create a new Open Access publisher that levels the playing field for scientists across the world. How? By making research easy to access, and puts the academic needs of the researchers before the business interests of publishers.
We are a community of more than 103,000 authors and editors from 3,291 institutions spanning 160 countries, including Nobel Prize winners and some of the world’s most-cited researchers. Publishing on IntechOpen allows authors to earn citations and find new collaborators, meaning more people see your work not only from your own field of study, but from other related fields too.
‘Smile is a universal language, shared by people all over the world’. It conveys a lot without saying anything at all. Our smile is of utmost importance and dental aesthetics play a vital role to create it. Smile designing (SD) consists of various components that aim to develop the overall personality of a patient. To create an aesthetic, smile is an organised and systematic approach that is required to evaluate, diagnose and resolve the problems associated with it. The ultimate goal of an aesthetic make-over is to ensure a stable masticatory system, where the oral hard and soft tissues remain in harmony. Hence this chapter aims to focus on various aspects of SD that includes its goals, components, procedure and future prospects.
Department of Conservative Dentistry and Endodontics, SRM Institute of Science and Technology, SRM Dental College, India
Shreya Kishore
Department of Orthodontics, SRM Institute of Science and Technology, SRM Dental College, India
Srujana Hemmanur
Department of Conservative Dentistry and Endodontics, SRM Institute of Science and Technology, SRM Dental College, India
*Address all correspondence to: monishak@srmist.edu.in
1. Introduction
The goal of smile designing is to create a harmonious balance between teeth, tissues, muscles, skeletal structures and joints while attending to the aesthetic requirement of the patient [1]. This requires complete understanding and knowledge of the symmetry, shape and proportions related to the hard and soft tissues of the oral cavity.
In dental treatment, aesthetics has traditionally been associated with profile enhancement. An organised and systematic approach is required to evaluate the aesthetic problems and diagnose and resolve them. The ultimate goal as clinicians is to achieve proportionate and pleasing composition in patients’ smiles by creating an arrangement of various aesthetic elements. Harmonising an aesthetic smile requires an integration of facial and dental composition. The dental composition includes tooth components and gingival components, one of the vital elements of smile designing [1].
2.1 Tooth components
Tooth components consist of the following:
2.1.1 Dental midline
The dental midline is the vertical contact interface between the two maxillary central incisors. It is to be parallel to the midline of the face and perpendicular to the interpupillary line. Other landmarks that can help assess the dental midline are the midline of the nose, forehead and the philtrum of the upper lip. To evaluate the midline, one must consider the location and alignment. The dental midline should be parallel to the long axis of the face, perpendicular to the incisal plane, and should be over the papilla, that is the midline that should drop straight down from the papilla [1, 2].
2.1.2 Incisal lengths
The position of the maxillary incisal edge is the most important determinant in smile line as it acts as a reference point to decide the tooth proportions and the gingival levels. The parameters used to help establish the maxillary incisal edge positions are the amount of tooth display during smile, the phonetics and the patient input.
The amount of tooth display is determined when the mouth/muscles around the mouth are relaxed. Ideally, 3.5 mm of incisal third of the maxillary centrals are visible, which continues to reduce as the patient ages, due to loss in muscle tonicity.
Phonetics is a primary determinant, and the various phonetics used are (i) M sound, (ii) E sound, (iii) F and V sounds and (iv) S sound.
Patient input is an important guide to determine the smile line, as the patient’s desire and satisfaction is the ultimate goal [1].
2.1.3 Tooth dimensions
Correct teeth proportions are essential in creating an aesthetically pleasing smile. Central dominance is a phenomenon that states that the centrals must be the dominant teeth in smile and should display pleasing proportions, as they are the key to an aesthetic smile. There are various guidelines for establishing correct proportions in an aesthetically pleasing smile, and they are as follows: [1, 3, 4].
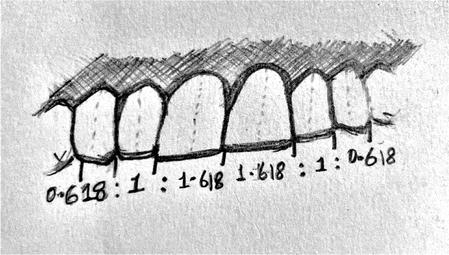
When viewed from the facial aspect, the width of each anterior is 60% of the width of the adjacent tooth. The mathematical ratio being 1.6:1:0.6 (Figure 1).
Golden proportion based on apparent width from the frontal view.
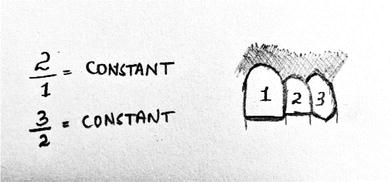
The successive width proportion when viewed from the facial aspect should remain constant as we move posteriorly from the midline. This theory offers greater flexibility to match tooth proportions with facial proportions (Figure 2).
M proportions compare the tooth width with the facial width using software on a computer, due to which, involves more scientific calculations rather than artistic analysis.
Dr. Chu’s research refutes the golden proportions. A series of gauges were made available to make the intra-oral analysis easier. The gauges allow fast and simple diagnosis of tooth discrepancies and are used as a reference guide between the clinician and the lab technician, which in turn reduces the incidence of communication errors.
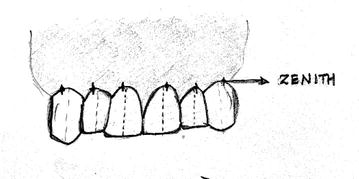
2.1.4 Zenith points
The most apical position of the cervical tooth margin where the gingival is most scalloped is known as the zenith point (Figure 3). It is located distal to the vertical axis of the tooth, except for lateral incisors where it is centrally located. Establishing the proper location of the zenith point is the critical step in altering the mesial and distal dimensions [4].
Figure 3.
Zenith points and their relation to the midline.
2.1.5 Axial inclinations
Also known as tooth inclinations, it compares the vertical alignment of maxillary teeth to central vertical midline. From the maxillary centrals to the maxillary canines, there should be a progressive increase in the mesial inclination of each subsequent anterior tooth, which looks natural. The evaluation of the axial inclination can be done in the frontal view photograph of the anterior teeth. The guide for labiolingual inclination is as follows: (i) maxillary central incisor is positioned vertically or slightly labial. (ii) maxillary lateral incisal edge is inclined slightly labially. (iii) the maxillary canine cusp is angulated lingually [1, 4].
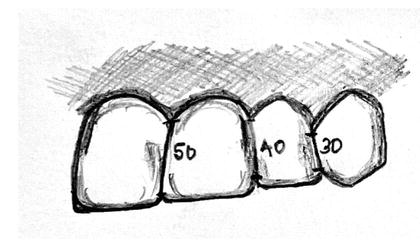
2.1.6 Contact area and contact point
Interproximal contact area (ICA) is defined as the broad zone in which two adjacent teeth touch (Figure 4). An increase in ICA helps to create an illusion of longer teeth, which in turn helps in eliminating black triangles [1].
Figure 4.
Interproximal contact area.
Interproximal contact point (ICP) is the most incisal aspect of the interproximal contact area.
2.1.7 Incisal embrasure
The incisal embrasures are supposed to display a natural, progressive increase in size from the centrals to the canines, which results in the interproximal contact points moving more apically as we move from the centrals to the canines to mimic the smile line. Failure in providing adequate incisal embrasure results in making the teeth appear too uniform and in loss of the incisor’s individuality [4].
2.2 Gingival components
This composes of the soft tissue component of smile designing and they are as follows:
2.2.1 Gingival health
It is of paramount importance that the gingival tissues are in proper health prior to the start of the treatment. Healthy gingiva usually exhibits the following characteristic features: (i) pale pink, stippled, firm in consistency, (ii) located 3 mm above the alveolar crestal bone and (iii) located interdentally, 5 mm above the inter-crestal bone, should be pointed and should fill the gingival embrasure right up to the contact area [5].
2.2.2 Gingival levels and harmony
Establishing the ideal gingival levels for each individual tooth is the key to creating a harmonious smile. The cervical gingival height of the maxillary centrals should be symmetrical and can match that of the canines. The gingival margin of the lateral incisor can be 0.5–2.0 mm short of the central incisors [5, 6].
2.2.3 Smile line
Smile line refers to an imaginary line along the incisal edges of the maxillary anterior teeth, which should mimic the curvature of the superior border of the lower lip while smiling.
Keep in mind that the lip line should not be confused with the smile line. It refers to the position of the inferior border of the upper lip during smile formation and thereby determines the display of tooth or gingiva. Showing 3–4 mm or more of the gingiva often requires cosmetic periodontal recontouring to achieve ideal results, as in cases of gummy smiles [1, 5].
Treatment modalities include veneers, direct or indirect and digital smile designing with help of software tools and CAD/CAM.
3.1 Veneers
Definition
A veneer is a layer of tooth-coloured material that is applied to a tooth to restore localised or generalised defects and intrinsic discolouration, a conservative aesthetic restoration of anterior teeth to mask discolouration, restore malformed teeth, close diastemas and correct minor tooth alignment [7].
History
Veneers were developed originally in the 1930s. California dentist Charles Pincus [8] developed thin facings of air-fired porcelain that could be fastened in place with adhesive denture powder. In 1955, Buonocore’s [8] research into the acid etch technique provided a simple method of increasing the adhesion to enamel surfaces for acrylic filling materials. In the 1970s, Faunce [8] described a one-piece acrylic resin prefabricated veneer as an improved alternative to direct composite resin bonding. Veneer was attached both chemically and mechanically. With the advent of materials like glass-infiltrated ceramics and zirconia techniques, the ease and precision with which veneers can be prepared have increased multi-folds [8].
Classification
On the basis of extent—Partial/Full
The partial veneers are the ones that partially cover tooth structure while full veneers encompass the full tooth structure with the veneer material.
On the basis of technique—Direct/Indirect
Direct application of composite material to create direct veneers is done while lab preparation of veneers using either composite or porcelain creates indirect veneers.
On the basis of material used—Composite/Porcelain
The use of different materials such as composite resin or porcelain are used to prepare veneers.
On the basis of mode of fabrication—Pre-fabricated/Custom made
Prefabricated veneers are the ones that are modified to fit any tooth size or shape while custom-made veneers are fabricated for a specific patient and are customised built.
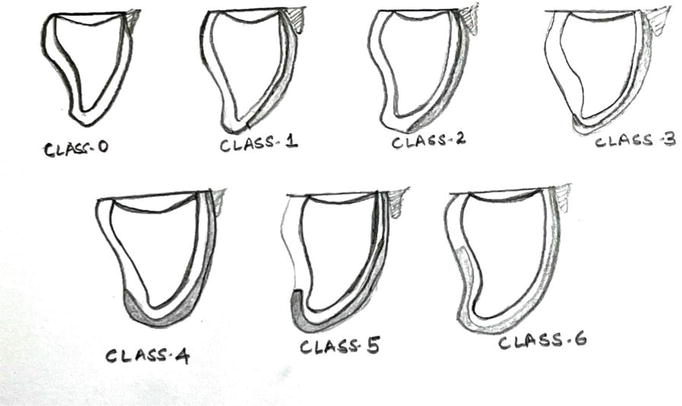
Class 0—no preparation: No preparation is done on any surface of the tooth for the luting of veneer.
Class 1—window preparation: This involves preparing the veneer short of the incisal edge and retaining the enamel over the incisal edge. The disadvantage here is the difficulty of hiding the margin.
Class 2—feather edge preparation: The preparation is taken or feathered to the incisal edge, with no reduction of the incisal edge length. The disadvantage of this preparation is that the margins can be subjected to shear forces in protrusion.
Class 3—bevel preparation: A bevel is carried over the incisal edge from buccal to palatal, with 1–2 mm of incisal reduction. A tooth preparation that incorporates incisal overlap is preferable, as the veneer is stronger and provides a positive seat during cementation. This preparation design has the advantage of simple tooth preparation, and the aesthetic characteristics are easier to fabricate with the ceramist, as it is possible to develop incisal translucency. The margin should not be in a position where it will be subjected to protrusive forces during excursive movements, therefore reducing the stress within the veneer while distributing the occlusal load over a wider surface area.
Class 4—overlapping preparation of incisal edge: The incisal edge is reduced with the preparation, then extended onto the palatal aspect. A positive seat is provided with this preparation, although there is a need to carefully evaluate the path of insertion to ensure that no undercuts are present.
Class 5—butt joint preparation: The butt joint preparation gives a 90-degree preparation all around the tooth that is to receive a veneer. The disadvantage is increased cutting of tooth structure.
Class 6—full veneer preparation: More or less like an anterior preparation for receiving a full veneer crown.
Figure 5.
Classification of veneers based on tooth preparation.
3.2 Indirect porcelain veneers
The indications, contraindications and advantages and disadvantages of indirect veneers are enumerated in Tables 1 and 2, respectively [8, 9].
Indication
Contradictions
Moderate discolourations, such as tetracycline staining, fluorosis, devitalized teeth and teeth darkened by age, are not conducive to vital bleaching.
Patients with certain tooth to tooth habits such as bruxism or parafunctional habits
Teeth with generalised moderate facial discolouration from amalgam shine-through
Insufficient enamel for bonding and sealing of the peripheries.
Surface defects. Small cracks in the enamel caused by ageing, trauma or ice chewing
Class III and end-on malocclusions
Replacement of missing or fractured parts of the teeth
Deciduous teeth
Closing of diastemas, single or multiple spaces between the teeth and improving the appearance of rotated or malpositioned teeth. An aesthetic illusion can be created but the ideal treatment would be orthodontic management.
Short teeth, teeth can be lengthened to a more aesthetic appropriate size
Malocclusions or periodontally compromised teeth
Agenesis of the lateral incisor
Progressive wear pattern, but sufficient enamel must remain and the desired increase in length is not excessive.
Functionally sound ceramo-metal or all-ceramic crowns with unsatisfactory hue.
Table 1.
Indications and contraindications of indirect veneers.
Advantages
Disadvantages
Natural and stable colour with smooth lustrous surfaces.
Colour cannot be modified easily once bonded
Highly acceptable tensile bond strength.
Irreversibility of preparation vs. little or no preparation for direct composite resin bonding.
Long-lasting
Level of difficulty of fabrication and placement, time involved and expense.
Exceptional resistance to wear
Technical difficulties in avoiding overcontours and obtaining closely fitted porcelain/enamel margins. The margins can be especially brittle and difficult to finish.
Resistance to stain
Lower reparability compared to composite veneers.
Extremely good biocompatibility with gingival tissues
Susceptibility to pitting by certain topical fluoride treatments.
Much less absorption of fluidprevents the decrease in physical properties of ceramics.
Surface lustre retention
Lack of radiopacity. It appears as natural tooth structure on radiographs.
Table 2.
Advantages and disadvantages of indirect veneers.
3.3 Clinical procedure
3.3.1 Labial preparation
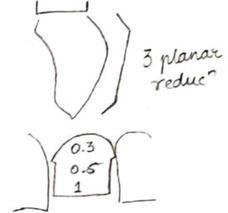
The preparation of the labial contour of anterior teeth must be done in three planes (3-plane reduction): incisal, middle third and cervical (Figure 6).
Figure 6.
Labial preparation.
Careful depth reduction of the tooth is done to provide a minimum of 0.3 mm (feldspathic porcelain) or 0.6 mm (Empress, e max) preparation. The enamel thickness at the gingival third is 0.3–0.5 mm, up to 0.6–1 mm at the middle third and 1.0–2.1 mm at the incisal third.
The use of depth cutters or grooves and dimples has been recommended to control tooth preparation [9].
3.3.2 Incisal edge reduction
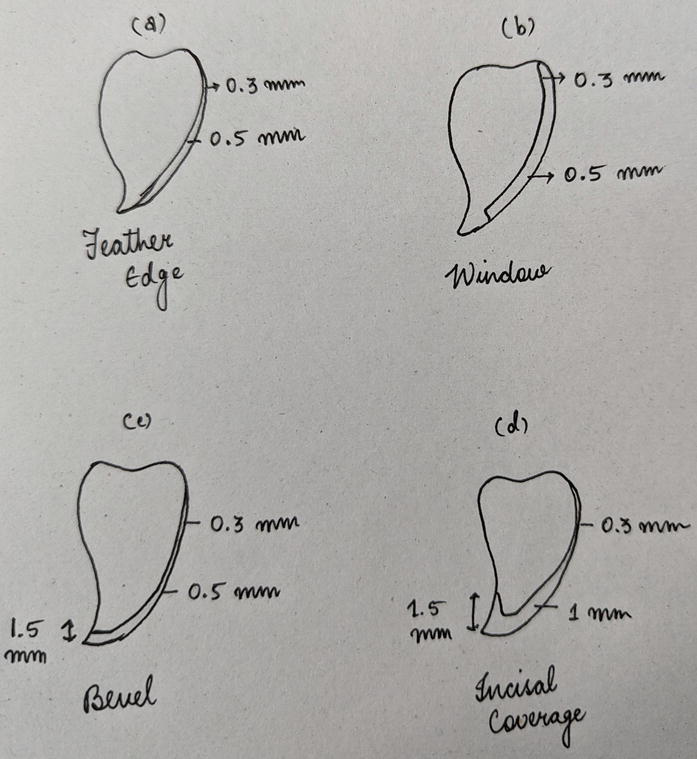
Four different preparation designs were possible (Table 3) (Figure 7) [9].
Feather preparation
Window preparation
Bevel preparation
Incisal overlap
The preparation is taken to the incisal edge, without reducing the incisal edge.
The veneer is short of the incisal edge, retaining the enamel over the incisal edge.
A bevel is carried over the incisal edge from buccal to palatal, with 1–2 mm of incisal reduction. Preferred because the veneer is stronger and provides a positive seat during cementation.
The incisal edge is reduced with the preparation and then extended onto the palatal aspect. A positive seat is provided with this preparation. No undercuts must be present.
Disadvantage: The margins can be subjected to shear forces in protrusion.
Disadvantage: difficulty of hiding the margin.
Advantage: simple tooth preparation and aesthetic characteristics are easier to fabricate with the ceramist, as it is possible to develop incisal translucency. The proper seating of the veneer is also enabled with the positive seat that is provided. The margin should not be in a position where it will be subjected to protrusive forces during excursive movements, therefore reducing the stress within the veneer while distributing the occlusal load over a wider surface area
Table 3.
Different preparation designs.
Figure 7.
Reduction according to type of veneer preparation.
3.3.3 Proximal reduction
The proximal preparation can be done by stopping short of breaking the contact, or by preparing through the contact point.
If contact points are left intact, it is preferable to leave the contact point with the margin ending approximately 0.25 mm or more labial to the contact region.
The visibility of the tooth: porcelain interproximal interface may be viewed or be hidden by the use of an L-shaped preparation or elbow preparation to hide the margins interproximally.
Breaking the contact is often used in changing the shape or position of teeth. With the additional space interproximally, adjustments in the contours and position of the teeth and width discrepancies can be done.
Preparations may extend further proximally with the presence of caries and existing restorations. Never should a margin lie on restoration or caries and should always lie on sound enamel [9].
3.3.4 Cervical margin
Chamfer with a maximum depth of 0.4 mm to ensure reproduction of natural tooth contours and prevents over-contouring.
It also ensured simple seating minimising stresses and enhances future fracture resistance of the veneer.
Supragingival or equigingival margins are preferred.
The prepared tooth then must be finished using finishing burs and abrasives and polished using pumice such that smooth surfaces are obtained [10].
3.3.5 Impressions
After the tooth prep is done, retraction cords are placed such that all the gingival margins are exposed. An accurate impression material such as polyvinyl siloxane, polyether or reversible hydrocolloid (agar) is used and a final impression is made.
Either a single-step impression or a two-step putty wash impression is made.
With advancement in technology, optical impressions are also being made. These impressions integrated with CAD CAM can instantaneously produce the required veneer [10].
3.3.6 Temporisation
The provisional restorations must be placed to improve interim aesthetics and decrease sensitivity. They also provide essential diagnostic information like veneer colour, shape, length and incisal edge configuration.
If it is a single-tooth veneer, the safest option is a light cured composite, which is used to directly build the tooth up. Central spot etching is done. No overhanging resin composite at the margins should be seen (Direct technique).
When provisionals for multiple teeth are needed, it is preferable to use a clear matrix made on a preop diagnostic cast. The teeth are spot etched, washed and dried. The facial and incisal areas in the clear matrix are filled with resin composite and the matrix is placed on the teeth and cured after removal of the excess. Instead of the composite, bis-acrylic temporization material (e.g. Luxatemp, DMG, Germany) can also be used (Indirect technique) [8].
3.3.7 Try-in and luting
After the veneer is obtained, the fit and shade are all evaluated in the try-in procedure and luting is performed. The teeth are treated with either the total-etch or self-etch protocol and the intaglio surface of the veneer is treated with 10% hydrofluoric acid. Resin cement is used to lute the veneer and the excess cement is removed and finishing and polishing the finish line [9].
3.4 Indirect composite veneers
Aka semi-direct veneers
The clinical technique is similar to that of indirect porcelain veneer. Instead of porcelain, the resin composite is used to create veneers extra orally and these are cured and fired/autoclaved to provide extra resistance to fracture. The finishing and polishing of the composite veneers are also done extra orally. Resin cement is used to lute these semi-direct veneers after treating the tooth with self-etch or total-etch bonding protocol.
The advantages include better strength and fracture resistance, chair-side controlled contouring, single appointment completion and minor adjustments that can be done while carrying out the procedure.
The disadvantages include long chairside appointments and proper patient compliance and are technique sensitive.
This includes (i) Fracture—poor positioning of the incisal margin, less incisal thickness and margin placed too sub-gingivally. (ii) Debonding—use of expired cement for luting and faulty veneer/tooth preparation.
Biological
Biological failures include (i) post-operative sensitivity (ii) improper curing of cement, (iii) exposed margins, (iv) poor marginal adaptation, (v) margins at DEJ and (vi) marginal microleakage due to poor fit and extension.
Aesthetic
Aesthetic complications include (i) improper shade selection and (ii) over contouring or improper margin placement in cases of gingival recession.
3.5 Direct veneers
A direct veneer is built up over the tooth surface by hand with composite material.
They are indicated in cases of aesthetically compromised anterior teeth, when one desires a younger and better smile, in cases of discoloured teeth, closure of diastemas and space closures, fractured teeth, anatomically malformed teeth, patient is a bruxer and clencher (Indirect veneers are contraindicated in such patients) [8, 11].
Whereas in patients with unacceptable occlusion, actively erupting tooth, presence of periodontal disease, insufficient coronal tooth structure, enamel irregularities or deficiencies, and extremely dark and stained tooth (underlying discolouration visible through the veneers) direct veneers are contraindicated [8, 11].
Advantages and disadvantages
The advantages associated with these veneers are that it can be done in a single visit, the dentists have chair side control of tooth anatomy, it can be repaired, patient compliance is not compromised, cheaper than the other alternative and there is minimal irreversible loss of tooth structure as the preparation is almost next to nil [8, 11].
On the contrary, they tend to discolour, there is increased chair side time, physical limitations of the material, they wear out more quickly, often require repair and have higher chances of replacement and marginal staining [8, 11].
3.5.1 Diagnostic considerations
Direct veneers can be done only when there is adequate amount of enamel present, there is tooth discolouration, in cases of orthodontic problems, in patients with habits like tobacco chewing or smoking, edge-to-edge occlusion, parafunctional habits and when one needs to meet patient’s expectations immediately [9].
3.5.2 Treatment planning and shade selection
Two sets of models are made so that one can be used to study the patients’ teeth and occlusion while another is used for a trial build-up (also known as an aesthetic mock up). A putty index is taken from it to replicate the mock-up [10].
Pre-operative photographs in natural lighting and monochrome must be taken to correctly evaluate the shade of the teeth. Shade tabs or colourimeters can also be used to determine the correct shade of the teeth. Another technique to achieve complex shades is the application of composite resin on non-bonded tooth surfaces and curing of the composite resin [8]. The first shade to be matched is for the dentin layer, followed by the shade for the enamel in the cervical and incisal areas [12].
3.5.3 Clinical steps
After shade matching, an intra-enamel tooth preparation should be done to a minimum depth of 1/4th to 3/4th thickness of enamel (depending on the severity of the case). Following this, the teeth are etched with 35% orthophosphoric acid, washed, dried and checked for frosty appearance. Next, the bonding agent is applied, air-dried and polymerised using light cure unit. After this, putty index is placed and placement of composite resin in layering technique is done to ensure shade matching. In case of dark discoloured teeth, an opaquer is used to mask the effect following which a dentin layer and enamel layer (cervical and incisal respectively) being applied and light cured. Finishing and polishing done 10 minutes after complete polymerisation are achieved. Burs, discs and wheels are used to reduce excess contours and final finishing and polishing are done using diamond discs and cups with polishing paste [9].
3.5.4 Failures of direct veneers
Composite veneers show around 60–70% of success rates in clinical studies. However, failures are seen to occur 2 to 5 years after placement what so ever the protocol or material is used.
Periodontal involvement: Due to the finish lines located near gingival margin and the presence of substances such as excess composite or bonding agents in the gingival crevices, which can act as irritants, gingival inflammation can occur.
Marginal breakdown: White lines may be seen as a result of finishing process. The composite tends to tear at the margins due to the effect of polymerisation shrinkage and the heat and friction produced during the finishing and polishing of the newly placed composite.
Occlusal-related chipping: This is seen especially in patients with parafunctional habits. Hence, the length and contouring of the veneer should be decided and perfected. Also, the occlusal table can be widened by adding extra material on the cuspid tip to resist shear forces.
Chipping at contact area: Seen due to occlusal trauma or fatigue caused by cyclic fatigue. A chamfer or rounded shoulder margin should be placed to avoid such chipping.
Layer separation: Occurs when composite is inadequately bonded to the tooth and other layers. Layering of composite under a completely sterile environment and carrying out proper polymerisation of each layer to prevent the presence of unpolymerized resin [9].
3.5.5 Strategies to repair failed direct veneers
Minor marginal breakdown can be treated with discing. Discing removes the damaged area and exposes the sound restoration underneath.
The repair of fractured composite such that new material is layered over existing composite should never be attempted. If a restoration needs repair, the old composite should be removed completely and the restoration must be repeated.
When a properly placed composite in a stress-bearing area fractures due to overloading stress, a better stress-bearing and stronger material should be used to restore the tooth instead of repeating the composite restoration [9].
Lumineers are made from a special patented Cerinate porcelain that is very strong but much thinner than traditional laboratory-fabricated veneers. The thickness is comparable to contact lenses [13]. Lumineers are a reversible procedure and it hardly requires removal of tooth structure. They will bond directly to the tooth and the longevity is up to 20 years.
Componeer (Coltene, Altstten, Switzerland) prefabricated veneers are thin composite resin shells (0.3 mm cervically and 0.6–1.0 mm to the incisal edge). These prefabricated veneers are made of a pre-polymerised hybrid composite resin and Synergy D6 (Coltene, Altstten, Switzerland) [14].
4.2 Digital smile designing (DSD)
With the new era of digitalization, use of softwares and computers allow for a repeatable and reproducible functional and aesthetic result. Components of DSD include a computer, DSD software, digital single-lens reflex (DSLR) camera or smartphone camera, intra-oral scanner, a printer and CAD/CAM system [15].
4.3 Photography and videography
Good quality photographs are a must as it forms the baseline to evaluate the changes as well as plan the treatment. It helps to form the facial and gingival reference lines such as the commissural lines, lip line and inter-pupillary line. The photographs and videographs should be taken accordingly (Tables 4 and 5) [15, 16, 17].
Frontal view-3
Proximal view-2
At 12 o’clock view
Intra occlusal view
1. Full face at rest. 2. Full face with teeth apart and wide smile. 3. Teeth apart retracted view of maxillary and mandibular arch.
1. Side view at rest. 2. Side view with full smile.
incisal edge of maxillary teeth visible and resting on lower lip with a wide smile.
second premolar to second premolar of maxillary arch.
Table 4.
Photographs.
Frontal video
Proximal video
At 12 o’clock video
Anterior occlusal video
Smiling with and without retractor
lips at rest and wide-smile
To allow visualisation of incisal edge
Keeping palatine raphe as a straight line from maxillary second premolar to second premolar
Table 5.
Videographs.
These images are uploaded in software that helps carry out the DSD. Various softwares are available depending on factors such as the dentist’s ease of use, digital workflow, cost, time effectiveness and compatibility with other digital tools and systems, for example, Smile designer Pro, Tasty Tech ltd. Toronto, Ontario, Canada; Microsoft PowerPoint, Microsoft Office, Redmond, Washington, USA; Keynote, iWork, Apple, Cupertino, California, USA.
Given the history of humans and their inspiration by principles of nature, the digital tool just like a manual tool performs facial analysis [18]. The horizontal (inter-pupillary and inter-commissural lines) and vertical references (facial midline through the glabella, nose and the chin) are marked and drawn against each other to calculate the facial symmetry. The software then places the wide smile photograph of the patient behind these reference lines to measure the vertical midline and horizontal plane for comparative evaluation between the teeth and face. Next, the dento-gingival analysis is done. Gingival display and smile curve is established and dental contouring is done based on the curvature of the lower lip and antero-posterior curvature of the teeth. Reference lines such as horizontal canine to canine tip, horizontal lines through incisal edges, vertical midline and gingival zenith are drawn to match the facial analysis. The dental length-to-width ratio is established by incorporating any one of the dental proportions such as the golden proportion, Pound’s theory, recurring aesthetic dental proportion and Dentogenic theory or Visagism (using temperament in concept of smile design, introduced by Braulio Paolucci). All the above measurements are then transferred to a 3D cast. Wax-up is then done and reflected onto the cast. The software then uses tools to make necessary changes and the final image is presented to the patient, this final image can also be altered based on the patient’s aesthetic needs and requirements. A 3D printer is used to process the digital wax-up, silicone index can be prepared out of the model and can be processed to create a provisional restoration. Mock-ups and alterations can be done on it. The final changes can be made and a scanner is used to feed it to the CAD/CAM machine [15, 16, 17]. The final approved 3D image of the preparation is obtained and final prosthesis is designed by the machine, this is called computer-aided designing. Appropriate size of the ceramic is chosen and the milling machine produces the veneers in accordance with the details fed into the computer [19]. An alternative method would be computer-aided designing/additive manufacturing using 3D printing to overcome the wastage of the material.
Various veneer materials are available and used by the CAD/CAM system such as feldspathic ceramics, mica-based ceramics, leucite-reinforced ceramics, lithium disilicate reinforced ceramics, glass infiltrated alumina and zirconia ceramics, polycrystalline alumina and zirconia, which includes yttria partially stabilised tetragonal zirconia polycrystals, magnesium partially stabilised zirconia and ceria stabilised zirconia/alumina nanocomposite. In 3D printing, the options available are light-cured resin, methacrylate-based resin, composites, hybrid composite resin, experimental PMMA-based nanocomposite, polymers and ceramic-filled hybrid resins such as experimental lithium disilicate-based ceramic-filled photosensitive resin [19, 20].
Advantages
Improved diagnosis and treatment planning.
Visualisation of treatment outcome.
Patients’ involvement and satisfaction.
Better communication amongst dentists as well as the dentist and the patient.
High-quality pre- and post-treatment evaluation [15, 16, 17].
Limitations
Dependency on accurate photographs and videos.
Expensive.
Need to have updated knowledge and skill to work with technology [15, 16, 17].
Creating a smile requires thorough knowledge and skill to replicate the natural smile. One needs to consider the components of smile designing, which includes the tooth as well as the gingival counterparts. Consideration of various proportions to achieve the shape, symmetry, function and aesthetic is required. With availability of tooth-coloured materials, achieving a natural smile is now possible. Composite or ceramic veneers help achieve maximum beautification with minimal preparation. Moreover, popularisation of software tools and CAD/CAM systems will help achieve maximum precision and patient satisfaction.
References
1.Bhuvaneshwaran M. Principles of smile design. Journal of Conservative Denstistry. 2010;13(4):225-232
2.Nigam M et al. Esthetic design. Journal of Orofacial Research. 2015;5(4):130-133
3.Calamia JR, Wolff MS. The components of smile design: New York University smile evaluation form revisited, update 2015. Dental Clinics. 1 Jul 2015;59(3):529-546
4.Sabri R. The eight components of balanced smile. JCO. 2005;36(3):155-167
5.Chakroborty G, Pal TK, Chakroborty A. A study on gingival component of smile. Journal of the International Clinical Dental Research Organization. 2015;7(2):111-115
6.Calamia JR, Levine JB, Lipp M, Cisneros G, Wolff MS. Smile design and treatment planning with the help of a comprehensive esthetic evaluation form. Dental Clinics. 1 Apr 2011;55(2):187-209
7.Lo ML. Book review: Mosby’s dental dictionary. British Dental Journal. 2014;217(4):168
8.Albers HF. Tooth colored restorations. In: Principle and Techniques. 9th ed. Hamilton. London: BC Decker Inc; 2002. p. 97
9.Goldstein RE, Chu SJ, Lee EA. Stappert CF. In: Ronald E, editor. Goldstein’s Esthetics in Dentistry. USA: John Wiley & Sons; 2018
10.Tylman SD, Malone WF. Tylman’s Theory and Practice of Fixed Prosthodontics. 7th ed. St. Louis: Mosby; 1978. pp. 96-134
11.Robertson T, Heymann HO, Swift EJ Jr. Sturdevant’s Art and Science of Operative Dentistry. Philadelphia, PA, USA: Elsevier Health Sciences; 2006
12.Fahl N, Ritter AV. Composite veneers: The direct–indirect technique revisited. Journal of Esthetic and Restorative Dentistry. 2021;33:7-19. DOI: 10.1111/jerd.12696
13.Zlatanovska K, Dimova C, Zarkova-Atanasova J. Minimally invasive aesthetic solutions - porcelain veneers and lumineers. DDF. 2017;376:111-120. DOI: 10.4028/www.scientific.net/ddf.376.111
14.Gomes G, Perdigão J. Prefabricated composite resin veneers–A clinical review. Journal of Esthetic and Restorative Dentistry. 2014;26(5):302-313. DOI: 10.1111/jerd.12114
15.Jafri Z, Ahmad N, Sawai M, Sultan N, Bhardwaj A. Digital smile design-an innovative tool in aesthetic dentistry. Journal of Oral Biology and Craniofacial Research. 2020;10(2):194-198
16.Thomas PA, Krishnamoorthi D, Mohan J, Raju R, Rajajayam S, Venkatesan S. Digital smile design. Journal of Pharmacy and Bioallied Sciences. 2022;14(5):43
17.Cervino G, Fiorillo L, Arzukanyan AV, Spagnuolo G, Cicciù M. Dental restorative digital workflow: Digital smile design from aesthetic to function. Dentistry Journal. 2019;7(2):30
18.Basheer N, Madhubala MM, Mahalaxmi S. Future perspectives of biomimetics in restorative dentistry. Journal of Pharmaceutical Research International. 2020;32(25):19-28
19.Liu PR, Isenberg BP, Leinfelder KF. Evaluating CAD-CAM generated ceramic veneers. Journal of the American Dental Association. 1993;124(4):59-63
20.Dawood A, Marti BM, Sauret-Jackson V, Darwood A. 3D printing in dentistry. British Dental Journal. 2015;219(11):521-529
Written By
Monisha P. Khatri, Shreya Kishore and Srujana Hemmanur
Submitted: December 29th, 2022Reviewed: February 10th, 2023Published: March 7th, 2023